
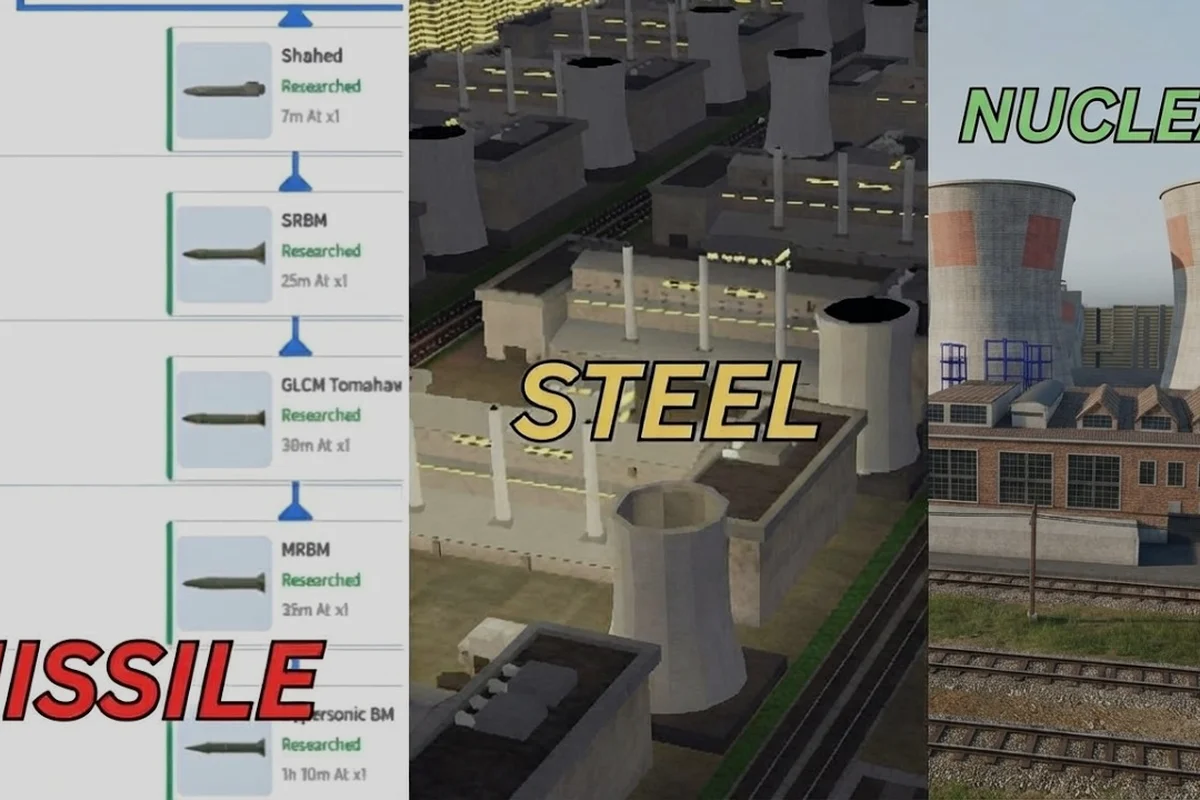
Missiles are the decisive strategic layer in Build and Conquer, turning a slow ground push into a sudden base wipe. Unlocking the full missile chain matters because each tier shifts how you pressure opponents, from early harassment to late-game knockout blows. This guide breaks down the exact unlock order, what each missile does, and how to reach the Hypersonic BM in the V0.1 beta.
Understanding the Missile Unlock Chain
The missile progression in Build and Conquer follows a fixed, creator-verified sequence that starts at the military base. You cannot skip ahead to heavier ordnance, because each unlock is gated behind the previous tier and a specific quest objective. The chain moves from short-range tactical strikes toward long-range strategic weapons, with each step requiring you to destroy enemy ground units or buildings to advance the unlock quest line.
According to the official Roblox game page, Build and Conquer launched on August 23, 2026, as a strategy title supporting up to eight players per server. The V0.1 beta is the only version currently available, so all missile behavior described here reflects that build. Community footage confirms the unlock order, though damage, cooldown, and reload numbers remain unpublished by the developer.
The full missile list in the current beta contains four weapons: the SRBM, the GLCM, the MRBM, and the Hypersonic BM. Each occupies a distinct role in your arsenal, and understanding how they differ helps you plan your unlock route efficiently. The table below summarizes the verified chain order and the general role of each missile type.
| Missile | Unlock Position | Role | Verified Status |
|---|---|---|---|
| SRBM | First | Short-range entry missile | Creator-verified |
| GLCM | Second | Ground-launched cruise missile | Creator-verified |
| MRBM | Third | Medium-range ballistic missile | Creator-verified |
| Hypersonic BM | Fourth | High-penetration final unlock | Creator-verified |
The unlock quest itself is straightforward in concept but demanding in execution. You need to destroy enemy ground units or buildings to progress, which means you cannot unlock missiles passively by sitting in your base. Aggressive play is mandatory, and the pace of your missile progression directly reflects how effectively you are pressuring the map.
SRBM Guide: Your First Missile Unlock
The SRBM, or short-range ballistic missile, is the entry point for the entire missile system. It unlocks first at the military base, which means you need to have that structure operational before the missile quest line becomes available. The SRBM serves as a tactical harassment tool rather than a game-ending weapon, giving you a way to punish exposed units and soften defenses from a safe distance.
Because the SRBM is your first missile, it teaches you the core mechanics of missile deployment without overwhelming you with resource costs. Community reports suggest that new players often underestimate how much map control they need to secure before investing in missiles, because the military base itself requires a stable economy and defensive perimeter. Rushing the base too early leaves you vulnerable to ground attacks while you save for missile infrastructure.
The following steps outline a reliable early-game sequence for reaching your first SRBM, but the order matters more than most new players expect: each phase gates the next, and skipping ahead to save time usually backfires. For example, if you build the military base before your economy can sustain constant harvester production, you will stall mid-quest and lose map control to a ground push. Conversely, players who secure a second resource expansion and a forward defensive line first can complete the unlock quest with enough surplus to deploy the SRBM immediately, turning the missile from a delayed tech investment into an active harassment tool within the same build cycle.
-
Establish a stable resource income before building the military base, because missile infrastructure drains funds quickly.
-
Build the military base in a defensible position, preferably behind your main defensive line.
-
Start the missile unlock quest and focus on destroying enemy ground units first, since they are easier to target than buildings.
-
Accumulate enough resources to deploy the SRBM once the unlock completes.
-
Use the SRBM against clustered enemy units or lightly defended structures to maximize early impact.
One important nuance about the SRBM is that its short range forces you to position launch assets closer to the front line. This creates a risk-reward dynamic, because the missile's effectiveness depends on how safely you can operate near contested territory. Players who master SRBM timing often transition smoothly into the longer-range tiers that follow.
GLCM Guide: The Cruise Missile Step
The GLCM, or ground-launched cruise missile, is the second unlock in the missile chain. It represents a significant upgrade over the SRBM because cruise missiles trade raw speed for precision and range. The GLCM unlock becomes available after you complete the SRBM step and continue destroying enemy ground units or buildings as part of the ongoing quest line.
What makes the GLCM distinct is its flight profile. Unlike a ballistic missile that arcs high and descends steeply, a cruise missile flies at lower altitude and can navigate toward its target. This matters in Build and Conquer because the GLCM is better suited for hitting specific structures or high-value units that sit behind terrain features. The trade-off, based on community testing, is that cruise missiles can be intercepted more easily if the enemy has anti-missile systems active.
The table below compares the general characteristics of the first two missile tiers based on verified role descriptions and community-reported behavior: the SRBM and GLCM differ most sharply in flight profile and interception risk, which directly shapes how you should sequence unlocks during a match. Early on, the SRBM's high ballistic arc makes it harder for point-defense systems to track, so it remains reliable for harassing clustered infantry or light vehicles even when the enemy has basic anti-missile coverage online. The GLCM, by contrast, flies a low cruise trajectory that trades that safety for extended range and the ability to thread around terrain, meaning you need to confirm whether the target base has active interception before committing a strike. Community testing suggests treating the two tiers as complementary rather than strictly linear upgrades: keep SRBM pressure on frontline units while holding GLCMs for precision hits on power generation or production buildings, because wasting a cruise missile on a well-defended chokepoint often results in a clean intercept with zero damage dealt.
| Attribute | SRBM | GLCM |
|---|---|---|
| Unlock order | First | Second |
| Flight profile | High ballistic arc | Low cruise trajectory |
| Primary use | Harassment, unit clearing | Precision structure strikes |
| Range category | Short | Extended |
| Interception risk | Moderate | Higher |
Because the GLCM unlocks second, it naturally fits into the mid-game phase where bases are more developed and targets are better defended. You should shift your targeting priority from raw unit kills toward key infrastructure, such as power generation or production buildings, once the GLCM is available. This transition keeps your missile pressure relevant as the game progresses.
The GLCM also pairs well with ground pushes, because you can use it to eliminate defensive emplacements just before your units advance. Timing the cruise missile strike to land as your ground forces arrive creates a window where the enemy must choose between rebuilding defenses or responding to your units. That decision pressure is where the GLCM earns its value.
MRBM Guide: Medium-Range Heavy Strikes
The MRBM, or medium-range ballistic missile, is the third unlock and the first missile that feels like a strategic weapon rather than a tactical tool. It delivers heavier strikes than the SRBM or GLCM, making it suitable for breaking fortified positions and punishing opponents who cluster their infrastructure. The MRBM unlock requires continued progress through the destroy-units-or-buildings quest after the GLCM step.
Reaching the MRBM stage signals that you have survived into the late-mid game, because the resource and infrastructure requirements are substantial. Community reports indicate that players who reach MRBM unlocks typically control enough of the map to fund repeated missile deployments. If you are struggling to afford MRBM launches, the problem is usually economic rather than mechanical.
The table below places the MRBM in context against the SRBM, GLCM, and Hypersonic BM, so you can see exactly where its unlock tier, strike weight, and optimal target profile diverge from the lighter and heavier options in the build and conquer missile list.
| Missile | Unlock Tier | Strike Weight | Best Target Type |
|---|---|---|---|
| SRBM | 1 | Light | Units, light structures |
| GLCM | 2 | Medium | Precision structures |
| MRBM | 3 | Heavy | Fortified positions, clusters |
| Hypersonic BM | 4 | Maximum | High-value, defended targets |
The MRBM's medium range means you can strike from safer positions than the SRBM allows, but you still need forward infrastructure to reach deep into enemy territory. This creates a strategic layer around base placement, because missile launch sites become valuable targets for your opponents. Defending your launch capability is as important as using the missiles themselves.
One effective MRBM pattern is to use it as a follow-up to a GLCM strike. The cruise missile can disable a key defensive system, and the MRBM then delivers the heavy payload against the now-exposed target. This two-missile combination is resource-intensive but extremely difficult to defend against when executed properly.
Hypersonic BM Guide: The Final Unlock
The Hypersonic BM is the fourth and final missile in the current Build and Conquer beta. Its defining trait is a very high chance to slip past anti-missile systems, which makes it the most reliable delivery method for late-game strikes. Unlocking the Hypersonic BM requires completing the entire destroy-units-or-buildings quest chain, so it only appears in longer matches where you have sustained offensive pressure from the early game onward.
The value of the Hypersonic BM lies in its penetration capability. By the time you unlock it, opponents have likely invested in anti-missile defenses to counter your SRBM, GLCM, and MRBM attacks. The Hypersonic BM is designed to overcome those defenses, restoring your ability to strike high-value targets even against a prepared enemy. This makes it a game-ending weapon in many scenarios.
The table below outlines the full missile list with their unlock positions and primary strategic functions, mapping each weapon to the destroy-units-or-buildings quest chain that gates its availability. Reading the table from top to bottom reveals the intended escalation: the SRBM arrives after only a handful of early kills, giving you a cheap harassment tool before opponents can afford anti-missile systems; the GLCM and MRBM then extend your range and damage as mid-game defenses come online; and the Hypersonic BM sits at the end of the chain precisely because it counters the late-game anti-missile investments your earlier strikes forced the enemy to make.
| Unlock Order | Missile | Strategic Function | Key Advantage |
|---|---|---|---|
| 1 | SRBM | Early harassment | Low cost, fast access |
| 2 | GLCM | Precision strikes | Extended range, accuracy |
| 3 | MRBM | Heavy bombardment | High damage potential |
| 4 | Hypersonic BM | Defense penetration | Bypasses anti-missile systems |
To get the Hypersonic BM consistently, you need to maintain offensive tempo throughout the match. The quest objective of destroying enemy ground units or buildings never pauses, which means passive play stalls your missile progression. Players who reach the Hypersonic BM typically have a clear plan for converting early SRBM pressure into mid-game GLCM and MRBM dominance.
For a deeper look at how these missiles perform in combat scenarios, the missile guide covers launch mechanics and target selection in more detail. Understanding the full unlock chain is only half the equation; knowing when to fire each missile type is what separates effective commanders from wasteful ones.
Optimizing Your Missile Unlock Speed
Accelerating your missile progression requires a focused approach to the destroy-units-or-buildings quest. The fastest unlocks come from players who balance unit kills with structure destruction, because both contribute to quest progress. Relying on only one target type slows you down, especially if the enemy adapts by spreading out units or reinforcing buildings.
The following strategies help you push through the missile chain efficiently: treat the unlock quest as a two-track system rather than a single grind, because unit kills and structure damage accrue at different rates and force different tactical commitments. Early SRBM volleys against clustered infantry or light vehicles clear the first progress thresholds cheaply, while saving your heavier ordnance for building-heavy phases prevents resource bleed on low-value targets. Players who front-load all their missile stockpiles into one target type often stall mid-chain when the enemy counters by repositioning units or repairing structures, so rotating between ground-unit sweeps and building strikes keeps quest progress climbing even when one vector gets shut down.
-
Prioritize destroying enemy ground units early, because they are easier to kill and provide steady quest progress.
-
Shift to building destruction once you have the GLCM, since structures offer larger progress chunks.
-
Keep your military base protected, because losing it halts missile production and stalls the unlock chain.
-
Coordinate missile strikes with ground pushes to maximize the damage you deal per resource spent.
-
Scout enemy anti-missile defenses before committing expensive MRBM or Hypersonic BM launches.
Another factor that affects unlock speed is how aggressively you expand your economy. Missiles require significant resources to deploy, and the unlock quest itself demands constant military action. Players who neglect economic development find themselves unable to afford the very weapons they are trying to unlock. Balancing expansion with aggression is the core skill for fast missile progression.
The tactical missile system also interacts with your broader military strategy, as covered in the tactical missiles guide. The unlock chain is linear, but how you use each missile tier depends heavily on the match situation and your opponent's defensive choices.
Frequently Asked Questions
What is the first missile I can unlock in Build and Conquer?
The SRBM is the first missile you unlock at the military base. It serves as a short-range entry weapon for harassing enemy units and softening light defenses. You need to start the missile unlock quest and destroy enemy ground units or buildings to progress toward it.
How do I unlock the GLCM in Build and Conquer?
The GLCM unlocks as the second step of the missile quest line after you complete the SRBM unlock. Continue destroying enemy ground units or buildings to advance the quest. The GLCM provides extended range and precision for striking specific structures from safer positions.
What makes the Hypersonic BM different from other missiles?
The Hypersonic BM has a very high chance to slip past anti-missile systems, making it the most reliable late-game strike option. It is the fourth and final unlock in the current beta. This penetration capability counters opponents who have invested heavily in missile interception defenses.
Can I skip the MRBM and unlock the Hypersonic BM directly?
No, the missile unlock chain is linear and creator-verified. You must progress through the SRBM, GLCM, and MRBM in order before the Hypersonic BM becomes available. Each tier requires continued progress on the destroy-units-or-buildings quest objective.
Are missile damage numbers published for the V0.1 beta?
No, the developer has not published damage, cooldown, or reload numbers for any missile in the V0.1 beta. The unlock order is creator-verified, but all numeric performance data remains unverified. Treat any specific damage figures you see as community-reported until officially confirmed.